¡@

Wisdom in mind,   enthusiasm at heart.

Home Products Warranty Shop Contact Us Shipment Chinese


¡@


D-28 (ES9038Pro)

 DAC + Discrete transistors Headphone amplifier & Preamplifier
With XLR & RCA analog inputs
built in Sabre ES9038Pro

USB / HDMI support DXD,up to DSD Native 512¡APCM 32Bit /384KHz
Heavy power supply by total of 10 groups of double stage PSU
1500 mW @ 100 ohm
(per channel) Pure class A output
9500mW @ 25 ohm (per channel) with H / L gain ,
drive the 80DB -115DB sensitivity headphone
easy
User can change the digital parameter settings on front plate

¡@


Summarize Use Manual Specs Shipping Cost

         The mini remote shipped without battery because the either DHL and EMS limit shipping by plane , customers want to buy one CR2025 battery and assemble in the remote.


Discontinued the analog idle input short circuit function:
         The unit  had design the analog idle input short circuit (In 5 and In 6) for avoid the disturb between different sources.
         This design also applied in a lot high end
brand devices.
          With the idle input short circuit function : if user select either the input 5 and input 6, the another input signal will short circuit then no any signal fire through circuits , can keep the sound quality had not degrade.
          Below cases user want to discontinued the idle input short circuit function, pull off the 6 jumpers as mark on the photo:
          1, The same extra source not only connect the
unit analog input, but connect with other amps simultaneity.
           2, The same extra source connect to the
unit input 6 and input 5  at simultaneity.


Set the sound to warmer and smoother:
        
  D-28 has 4 group pins to set the sound warmer and smoother, for match with different user favorite or the headphone sound flavor .
           User only want to push into 4 pcs of jumper on the pins, that mark in below photo .(This setting effect all inputs sound flavor).
           Except that , the D-28 can through change the digital filter's parameter to change the sound flavors .(Only effect with digital input, see below text ) .


M
anual:

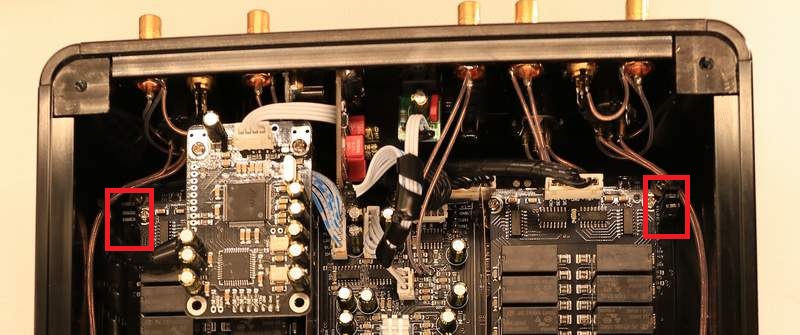
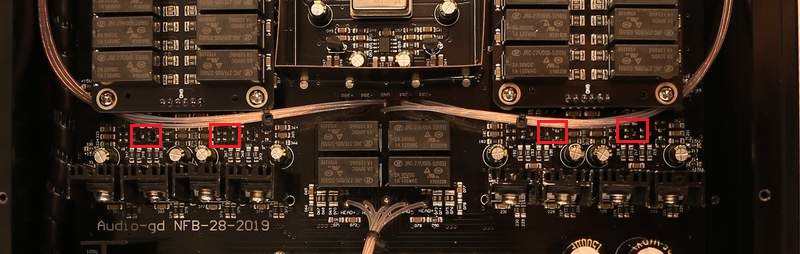
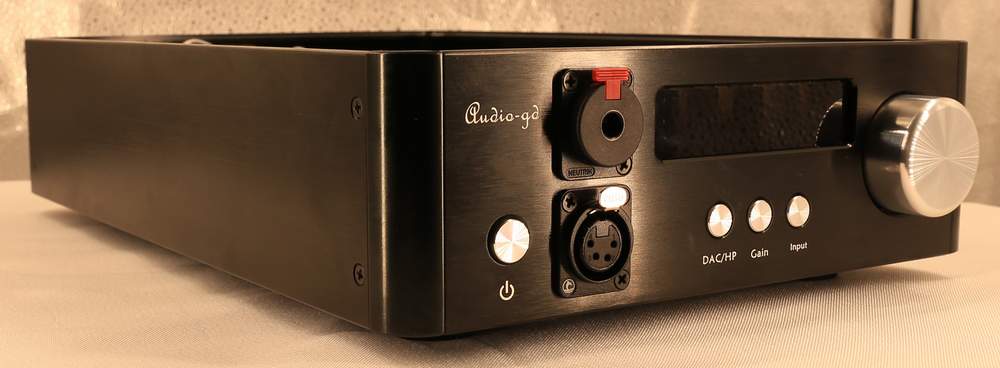
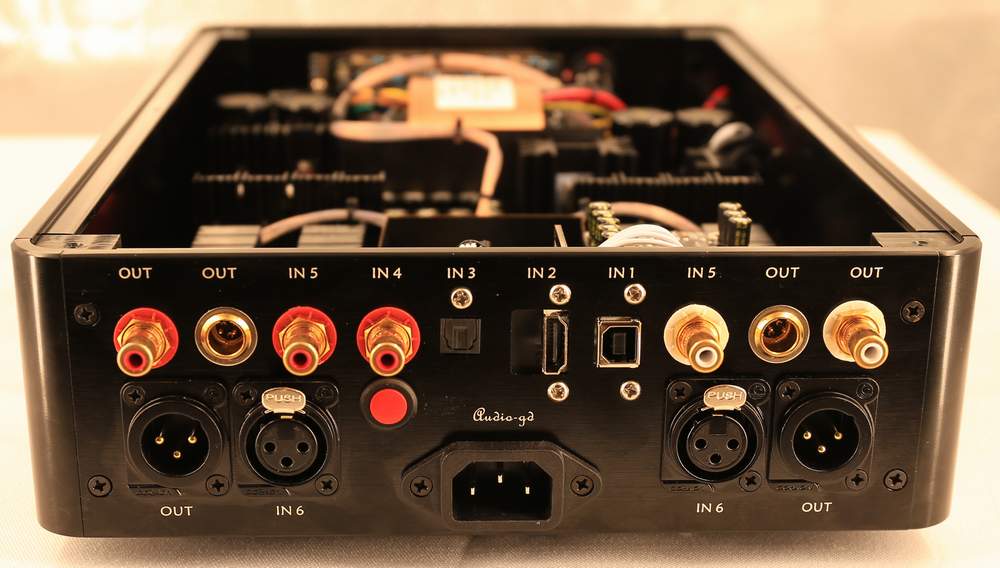
Select the input channel:
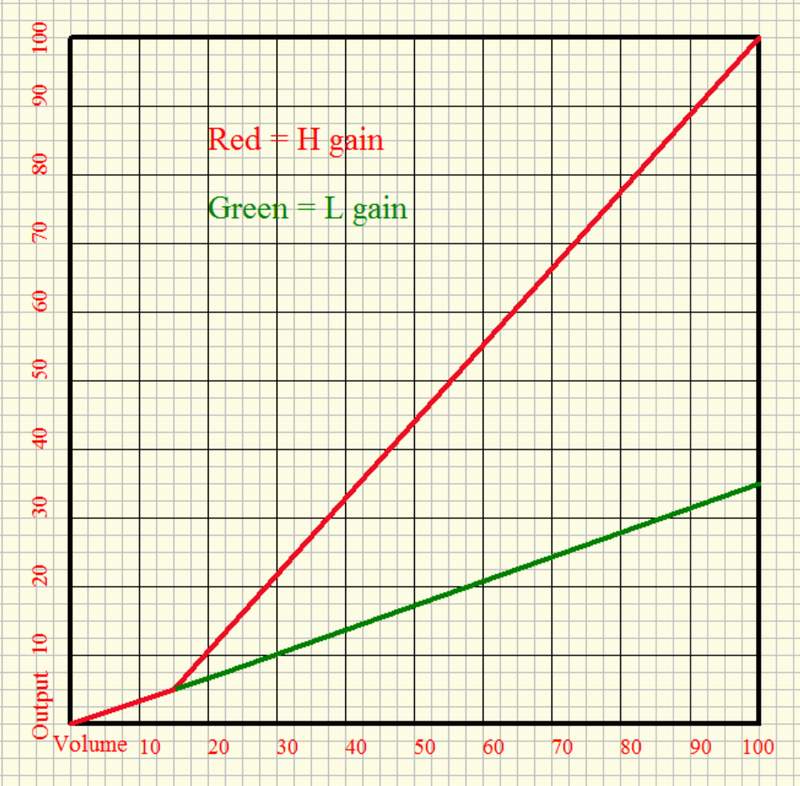
Push the "Input" button to select the input channel.
Input 1: USB input
Input 2: HDMI-IIS input
Input 3: Optical input
Input 4: Coaxial input
Input 5: RCA analog input
Input 6: XLR analog input

Gain mode: 
Push the button "Gain", the display will show between " L, H" .

"L" mean the unit working on low gain (10DB gain , for normal sensitivity headphones or work as preamp output).

"H" mean the unit working on high gain (20DB gain for the low sensitivity headphones or the low output level external sources ).
We have
applied the new gain technology ,no any switches, relays or parameter of the amp change while change the gain modes so the sound quality is exact same in different gain modes. Users just want to choice the mode for easy adjust the volume level.

Output mode: 
Push the button "DAC/HP", the display shows between " P , H" or "d,H".

"P" mean the unit output from XLR / RCA / ACSS on rear. XLR and RCA can connect  at simultaneity.

"H" mean the unit output for headphones on front plate.
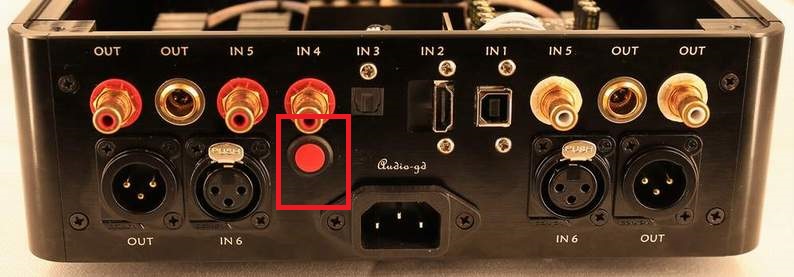
¡§d¡§ While the red button push into , the "P" mode change to display "d" , it mean the all rear outputs without volume control, work in the DAC mode .(Please note : If users connect with the non volume power amp or active speaker, must ensure can not set to DAC mode . The headphone output always with volume control .)


Volume knob :

Change volume .

¡@

Function setting introduce :
         The unit can set the inside parameters from front plate without open the unit .

Please note:
         If the unit had connect to the external power amp , while user want to change the setting, please shut down the power amp volume .

DAC/HP button :
          While the input channel selected between 1 to 4 , push the ¡§DAC/HP¡¨ once, the display left 1st number blinking,  push it again go into the setting menu while it blinking .
          In the setting menu, the left 1st number blinking, it mean this number can change the setting by push the "Input" button .
          In the setting menu, push the "DAC/HP" can blink  the next right one number . Push the "Gain" button can blink the next left one number . .

Left 1st number¡GPCM digital filter modes :
         
Display 1:
Fast roll-off,  Linear.
          Display 2:
Slow roll-off, Linear.
          Display 3:
Fast roll-off, Minimum. (Recommend for neutral sound)
          Display 4:
Slow roll-off, Minimum
          Display 5:
Fast roll-off, Apodizing.
          Display 6:
Fast roll-off, Hybrid.
          Display 7:
Brickwall filter.

Left 2nd number¡GDSD digital filter roll off parameter:
          
Display 4: 47KHz .
          Display 5: 50KHz
.
          Display 6:
60KHz.
          Display 7:
70KHz. (Recommend for neutral sound)

Left 3rd number¡GAuto DARK  :
          Set to 0, the unit display always lights while power on.
          Set to 1, the unit auto dark after around 10 seconds while the unit without operate any buttons, there is only a LED has light for show the unit power state.

Left 4th number¡GRemote mode :
          Set to 0, whether long or short push the remote controller volume button, the unit volume only change 1 step .
          Set to 1, push and hold the remote controller volume button, the unit volume change continuously .
           In case if set to 1 but the unit had control by other devices , set to 0 please.

Right one number
¡GMemory mode :
           Set to 0, the unit has not volume memory .
           Set to 1, the unit has volume memory even restart . (Based on the exist memory chip technology, the memory life is 100,000 times , for the memory chip life can over 10 years, we design the memory write data at 3 seconds after stop all operate on the unit . If the memory over life, the unit just can not memory but has not effect the working ) .

¡@


HDMI definitions :
 
(Apply HDMI transmit the IIS signal, the pin's definitions must exact same , and not promise compatible with other brands)
Pin 1 :       SDATA -                     
Pin 2 :       GND                         
Pin 3 :       SDATA +                    
Pin 4 :       SCLK +                       
Pin 5 :       GND                         
Pin 6 :       SCLK -
Pin 7 :       LRCK -                        
Pin 8 :       GND                         
Pin 9 :       LRCK +
Pin 10:      NC                     
Pin 11:      GND                         
Pin 12:      NC
Pin 13:      NC                            
Pin 14:      NC                           
Pin 15:      NC
Pin 16:      NC                            
Pin 17:      GND                         
Pin 18:      NC
Pin 19:      NC

¡@


¡@

备®×§Ç号:粤ICP备05020367号

ª©权©Ò¦³:          ¦ó庆华  ºÍ§Ó­µ响

Copyright(C) 2004   www.audio-gd.com    All Rights Reserved¡@